Rudder fabric
Monday, 30th May, 2011
By early May, and with the tail plane fitted, it came time to fabric cover the rudder, which I was relieved to find had survived its long incarceration in storage without warping.
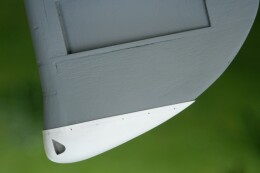
I chose to use Solartex, a woven material specially created for aero modellers, but first I had to tackle the cup-shaped aluminium pressing that in the real aircraft forms the removable heel of the rudder. The shape ruled out using litho plate, but fortunately, since it would be painted, I was able to resort to styrene sheet and my homemade vac-form box. Creating the pattern was easy. I simply set the rudder frame up vertically on the bench with the heel suspended inside a suitable container into which to pour silicone rubber. By filling the resulting mould with casting resin I was able very quickly to produce an exact pattern over which to vac form the piece. This much was easy. Also by way of preamble I made the tail light assembly and the small fairing for the trim tab linkage.
Applying Solartex is relatively easy with care and attention to the manufacturers’ instructions. The material has its own heat activated glue, and once it is tacked in place and the edges trimmed and sealed it can be stretched drum tight by further application of a heat iron. Unlike the British practise of ‘stitching’ fabric surfaces to airframes, the Americans used small screws and cup washers to perform the same function. The pictures here show the very simple ruse I used to mimic this, comprising strips of a masking tape and tiny punched pewter discs to simulate the cupped washers.
Now I confess to compromise: Rib tapes have distinct crimped edges to prevent fraying. I have described elsewhere on this website how I had these specially laser cut at significant cost for my Spitfire. Happily, I had enough left over to do the P-51’s rudder, saving considerable time and further expense; unhappily, the width of these tapes is slightly undersize for the Mustang. It was a hard decision, but I decided to go with what I had: I know it is wrong, you know it is wrong, but there are many who will not. I believe I have achieved a result that will be criticised only from close scrutiny, but it is not, I fear, this model’s finest feature, and perhaps already it is coming back to haunt me!
An advantage of Solartex is that it accepts most types of paint, enabling me to finish the rudder with automotive primer and the silver grey topcoat used for the aileron leading edges and trim tabs. Now I have to worry about the serial numbers and black painted stripe, but that’s for another day.


Previous post

Assembling the fin and tailplane
Next post

Spinning the spinner

