Wings and fuselage united
Tuesday, 19th April, 2011
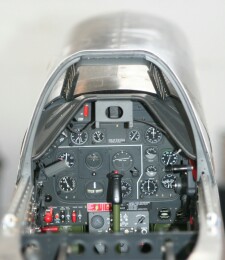
With the instrument panel completed and installed, and while there was still access from below, I could finally start to furnish the cockpit with a multitude of previously completed switch panels and other sub-assemblies. Only then would it be possible to join the wings to the fuselage permanently. As a further preamble, I needed to fit the control column and torque shaft assembly, which is bolted directly to the upper wing, and this meant making the pilot’s hand grip, which I carved out of a piece of discarded resin, adding the gun button and trigger details in aluminium.
The instrument panel’s emplacement also meant that I could permanently install the distinctive black shroud that surrounds it and then finalise the windscreen sub assembly and glazing, including the peripheral skinning and cover plates needed to fair the entire assembly into the main fuselage and nose section. Peeling off the unsightly protective laminate from the Perspex windscreen, a precaution I had lived with for many, many months, was a most satisfying moment.
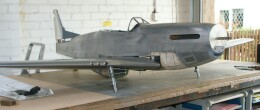
The wing is held to the fuselage with four large captive bolts, the nuts being hidden under the cockpit flooring – two port and two starboard – with a further fixing forward on the fuselage centre line. Reassured by repeated trial fittings and some shim to true the mainplane, I tightened them up for the final time – a seminal moment after five years’ work, marred only by last-minute doubts that there might no longer be space remaining in which to squeeze the two bulky cockpit floor halves around the newly installed control column. I resolved this issue only to discover that the flooring assembly was impeded in places by the coolant pipes running fore and aft atop to wing and other gubbins projecting from the wheelwells. It was all a bit like getting a ship into a bottle, but it came good in the end. Instead of two large pieces of aeroplane, I now had one even larger piece: The model had finally outgrown my warm, snug workshop, which meant moving into the unheated double garage, and it was still only February!
Eager to see the radiator scoop installed, I braved the chill and carried on. I had lined the scoop’s interior with pewter sheet several years previously; now after some minor adjustments it fitted into place nicely, secured by half a dozen small wood screws. I used more pewter to skin the tight curves around the external lip of the intake, reverting to litho plate for the rest. With the scoop installed there remained only a few of the lower engine cowlings left to do, and this meant making good with scraps of balsa and cellulose automotive filler the little trough left where the wing leading edge fairs into the fuselage nose section. During March 2011, I formed and added the very last piece of alloy skin, another significant moment, because now, apart from a minor inspection door or two, not a trace of underlying wood remained visible. How many individual skin components are there in the Mustang’s airframe? I don’t know. One day I’ll count them. But one thing was certain and most gratifying: With the model’s wooden core now invisible, it was at last beginning to look ‘engineered’!


Previous post

Instrument panel complete
Next post

Wing root fairings

